Nginx 高级配置及第三方模块
Nginx 状态页
基于nginx 模块 ngx_http_stub_status_module 实现,在编译安装nginx的时候需要添加编译参数 –with-http_stub_status_module
注意:状态页显示的是整个服务器的状态,而非虚拟主机的状态
配置示例
[root@centos7 conf.d]# nginx -V  #查看nginx编译参数,确定添加了ngx_http_stub_status_module模块
nginx version: nginx/1.18.0
built by gcc 4.8.5 20150623 (Red Hat 4.8.5-44) (GCC)
built with OpenSSL 1.0.2k-fips  26 Jan 2017
TLS SNI support enabled
configure arguments: --prefix=/apps/nginx --user=nginx --group=nginx --with-http_ssl_module --with-http_v2_module --with-http_realip_module --with-http_stub_status_module --with-http_gzip_static_module --with-pcre --with-stream --with-stream_ssl_module --with-stream_realip_module
[root@centos7 conf.d]# pwd
/apps/nginx/conf.d
[root@centos7 conf.d]# cat pc.conf #编辑虚拟主机,添加状态页配置
server {
  listen 80 default_server;
  server_name pc.test.org;

  location /nginx_status {  #状态页uri匹配规则
        stub_status;
   }
}

##访问测试
[root@centos7 conf.d]# curl pc.test.org/nginx_status/
Active connections: 1
server accepts handled requests
 11 11 15   #分别对应accepts,handled,requests三个字段
Reading: 0 Writing: 1 Waiting: 0

##参数解释
Active connections: #当前处于活动状态的客户端连接数(=reading+writing+waiting)
accepts:#统计总值,Nginx自启动后已经接受的客户端请求连接的总数。
handled:#统计总值,Nginx自启动后已经处理完成的客户端请求连接总数,通常等于accepts,除非有因为worker_connections限制等被拒绝的连接
requests:#统计总值,Nginx自启动后客户端发来的总的请求数(单次连接可能发生多次请求)。
Reading:#当前状态,正在读取客户端请求报文首部的连接的连接数,数值越大,说明排队现象严重,性能不足
Writing:#当前状态,正在向客户端发送响应报文过程中的连接数,数值越大,说明访问量很大
Waiting:#当前状态,正在等待客户端发出请求的空闲连接数,开启 keep-alive的情况下,这个值等于active – (reading+writing)
Nginx 第三方模块
第三方模块是对nginx 的功能扩展,第三方模块需要在编译安装nginx的时候使用参数–add-module=PATH指定路径添加,有的模块是由公司的开发人员针对业务需求定制开发的,有的模块是开源爱好者开发好之后上传到github进行开源的模块,nginx的第三方模块需要从源码重新编译进行支持
比如:开源的echo模块 https:/github.com/openresty/echo-nginx-module
示例:添加第三方模块 echo-nginx-module
#配置虚拟主机使用echo-nginx-module模块
[root@centos7 conf.d]# cat pc.conf
server {
  listen 80 default_server;
  server_name pc.test.org;

  location /main {
	index index.html;
 	default_type text/html;
	echo "hello world-->";
	echo $remote_addr;
	echo_reset_timer;  #将计时器开始时间重置为当前时间
	echo_location /sub1;
	echo_location /sub2;
	echo "took $echo_time_elapsed sed for total.";
   }
}

location /sub1 {
	echo_sleep 1;
	echo sub1;
}

location /sub2 {
	echo_sleep 1;
	echo sub2;
}

#语法检查报错
[root@centos7 conf.d]# nginx -t
nginx: [emerg] unknown directive "echo" in /apps/nginx/conf.d/pc.conf:8 #不支持echo模块
nginx: configuration file /apps/nginx/conf/nginx.conf test failed

#查看当前nginx并未添加echo-nginx-module模块
[root@centos7 conf.d]# nginx -V
nginx version: nginx/1.18.0
built by gcc 4.8.5 20150623 (Red Hat 4.8.5-44) (GCC)
built with OpenSSL 1.0.2k-fips  26 Jan 2017
TLS SNI support enabled
configure arguments: --prefix=/apps/nginx --user=nginx --group=nginx --with-http_ssl_module --with-http_v2_module --with-http_realip_module --with-http_stub_status_module --with-http_gzip_static_module --with-pcre --with-stream --with-stream_ssl_module --with-stream_realip_module

###下载echo-nginx-mudule模块,重新编译nginx并添加此模块
[root@centos7 src]# nginx -s stop  #停止老版本nginx
[root@centos7 conf.d]# cd /usr/local/src
[root@centos7 src]# git clone https:/github.com/openresty/echo-nginx-module.git
[root@centos7 nginx-1.18.0]#  ./configure \
--prefix=/apps/nginx \
--user=nginx --group=nginx \
--with-http_ssl_module \
--with-http_v2_module \
--with-http_realip_module \
--with-http_stub_status_module \
--with-http_gzip_static_module \
--with-pcre \
--with-stream \
--with-stream_ssl_module \
--with-stream_realip_module \
--with-http_perl_module \
--add-module=/usr/local/src/echo-nginx-module  #指定模块源代码路径

[root@centos7 src]# make && make install

root@centos7 nginx-1.18.0]# /apps/nginx/sbin/nginx -t  #语法检查通过
nginx: the configuration file /apps/nginx/conf/nginx.conf syntax is ok
nginx: configuration file /apps/nginx/conf/nginx.conf test is successful

[root@centos7 nginx-1.18.0]# /apps/nginx/sbin/nginx -V  #查看编译后的新版本
nginx version: nginx/1.18.0
built by gcc 4.8.5 20150623 (Red Hat 4.8.5-44) (GCC)
built with OpenSSL 1.0.2k-fips  26 Jan 2017
TLS SNI support enabled
configure arguments: --prefix=/apps/nginx --user=nginx --group=nginx --with-http_ssl_module --with-http_v2_module --with-http_realip_module --with-http_stub_status_module --with-http_gzip_static_module --with-pcre --with-stream --with-stream_ssl_module --with-stream_realip_module --add-module=/usr/local/src/echo-nginx-module

#访问测试
[root@centos7 nginx-1.18.0]# nginx
[root@centos7 nginx-1.18.0]# curl pc.test.org/main/
hello world-->
172.16.16.88
sub1
sub2
took 2.009 sed for total.
Nginx 使用变量
nginx的变量可以在配置文件中引用,作为功能判断或者日志等场景使用
变量可以分为内置变量和自定义变量
内置变量是由nginx模块自带,通过变量可以获取到众多的与客户端访问相关的值。
内置变量
官方文档 http:/nginx.org/en/docs/varindex.html
常用内置变量
$remote_addr; #存放了客户端的地址,注意是客户端的公网IP

$proxy_add_x_forwarded_for  #此变量表示将客户端IP追加请求报文中X-Forwarded-For首部字段,多个IP之间用逗号分隔,如果请求中没有X-Forwarded-For, 就使用$remote_addr
the “X-Forwarded-For” client request header field with the $remote_addr variable
appended to it, separated by a comma. If the “X-Forwarded-For” field is not
present in the client request header, the $proxy_add_x_forwarded_for variable is
equal to the $remote_addr variable.

$args; #存放了URL中的所有参数,例如:对于http:/www.magedu.org/main/index.do?id=20190221&partner=search $args的值就是:id=20190221&partner=search

$document_root; #保存了针对当前资源的请求的系统根目录,例如:/apps/nginx/html。

$document_uri; #保存了当前请求中不包含参数的URI,注意是不包含请求的指令,比如:http:/www.magedu.org/main/index.do?id=20190221&partner=search会被定义为/main/index.do
#$document_uri的值为:/main/index.do

$host; #存放了请求的host名称
$limit_rate; #如果nginx服务器使用limit_rate配置了显示网络速率,则会显示,如果没有设置, 则显示0
$remote_port; #客户端请求Nginx服务器时随机打开的端口,这是每个客户端自己的端口
$remote_user; #已经经过Auth Basic Module验证的用户名
$request_body_file; #做反向代理时发给后端服务器的本地资源的名称
$request_method; #请求资源的方式,GET/PUT/DELETE等
$request_filename; #当前请求的资源文件的磁盘路径,由root或alias指令与URI请求生成的文件绝对路径,如:/apps/nginx/html/main/index.html
$request_uri; #包含请求参数的原始URI,不包含主机名,相当于:$document_uri?$args,例如:/main/index.do?id=20190221&partner=search
$scheme; #请求的协议,例如:http,https,ftp等
$server_protocol; #保存了客户端请求资源使用的协议的版本,例如:HTTP/1.0,HTTP/1.1,HTTP/2.0等
$server_addr; #保存了服务器的IP地址
$server_name; #请求的服务器的主机名
$server_port; #请求的服务器的端口号
$http_user_agent; #客户端浏览器的详细信息
$http_cookie; #客户端的所有cookie信息
$cookie_<name> #cookie中某个字段值,name为任意请求报文首部字部cookie的key

$http_<name> #name为任意请求报文首部字段,表示记录请求报文的首部字段,name的对应的首部字段名需要为小写,如果有横线需要替换为下划线。
#示例:
echo $http_user_agent;
echo $http_host;

$sent_http_<name> #name为响应报文的首部字段,name的对应的首部字段名需要为小写,如果有横线需要替换为下划线,此变量有问题
#示例:
echo $sent_http_server;

$arg_<name> #此变量存放了URL中的指定参数,name为请求url中指定的参数名
#示例
echo $arg_id;
范例:
##站点配置
[root@centos7 ~]# cat /apps/nginx/conf.d/pc.conf
server {
  listen 80 default_server;
  server_name pc.test.org;

  location /main {
   	index index.html;
	default_type text/html;
	echo $remote_addr;
	echo $args;
	echo $document_root;
	echo $document_uri;
	echo $host;
	echo $http_user_agent;
	echo $http_cookie;
	echo $request_filename;
	echo $scheme;
	echo $scheme:/$host$document_uri?$args;
   }
}

##返回结果
[root@centos7 ~]# curl -b title=test 'http:/pc.test.org/main/index.do?id=2022&partner=search'
172.16.16.88
id=2022&partner=search
/apps/nginx/html
/main/index.do
pc.test.org
curl/7.29.0
title=test
/apps/nginx/html/main/index.do
http
http:/pc.test.org/main/index.do?id=2022&partner=search
范例:
##站点配置
[root@centos7 ~]# cat /apps/nginx/conf.d/www.conf
server {
  listen 80;
  server_name www.test.com;
  location /echo {
	echo $request;
	echo $proxy_add_x_forwarded_for;
	echo $args;
	echo $document_uri;
	echo $request_uri;
	echo $document_root;
	echo $host;
	echo $request_method;
	echo $request_filename;
	echo $scheme;
	set  $test $http_host;   #自定义变量,将$http_host的值赋给test变量
	echo $test;
	echo $http_User_Agent;
	echo $http_cookie;
	echo $cookie_key1;
   }
}


##访问测试
[root@centos7 ~]# curl -b 'key1=v1;key2=v2' "http:/www.test.com/echo/index.html?id=666&partner=search"
GET /echo/index.html?id=666&partner=search HTTP/1.1
172.16.16.88
id=666&partner=search
/echo/index.html
/echo/index.html?id=666&partner=search
/apps/nginx/html
www.test.com
GET
/apps/nginx/html/echo/index.html
http
www.test.com
curl/7.29.0
key1=v1;key2=v2
v1
自定义变量
语法格式:
Syntax: set $variable value;
Default: —
Context: server, location, if
范例:
##站点配置
[root@centos7 ~]# cat /apps/nginx/conf.d/www.conf
server {
  listen 80;
  server_name www.test.com;
  location /echo {
	set $name test;
	echo $name;
	set $my_port $server_port;
	echo $my_port;
	echo "server_name:$server_port";
   }
}

##访问测试
[root@centos7 ~]# curl www.test.com/echo
GET /echo HTTP/1.1
172.16.16.88

/echo
/echo
/apps/nginx/html
www.test.com
GET
/apps/nginx/html/echo
http
www.test.com
curl/7.29.0
Nginx 自定义访问日志
访问日志是记录客户端即用户的具体请求内容信息,而在全局配置模块中的error_log是记录nginx服务器运行时的日志保存路径和日志的level,两者是不同的,而且Nginx的错误日志一般只有一个,但是访问日志可以在不同的server中定义多个。定义访问日志使用access_log指令指定日志保存路径,使用log_format指定日志的格式,格式中定义要保存的具体的日志内容。
访问日志由 ngx_http_log_module 模块实现
官方帮助文档:http:/nginx.org/en/docs/http/ngx_http_log_module.html
语法格式:
Syntax: access_log path [format [buffer=size] [gzip[=level]] [flush=time]
[if=condition]];
access_log off;
Default:
access_log logs/access.log combined;
Context: http, server, location, if in location, limit_except
自定义日志默认格式
如果要保留日志的源格式,只需添加相应的日志内容,配置如下:
http {
    ...
    log_format my_nginx_format
        '$remote_addr - $remote_user [$time_local] "$request"'
        '$status $body_bytes_sent "$http_referer"'
        '"$http_user_agent" "$http_x_forwarded_for"'
        '$server_name:$server_port';
    access_log logs/access.log my_nginx_format;
    ...
}

#注意:此指令一定要放在log_format命令后(nginx配置从上至下依次生效)
access_log logs/access.log my_nginx_format;

##重启nginx访问测试
[root@centos7 nginx]# tail -3 logs/access.log
172.16.16.88 - - [02/Aug/2022:23:51:26 +0800] "GET /echo HTTP/1.1" 200 211 "-" "curl/7.29.0"  #默认日志格式
172.16.16.88 - - [04/Aug/2022:19:08:42 +0800] "GET / HTTP/1.1"200 6 "-""curl/7.29.0" "-"pc.test.org:80  #自定义日志格式my_nginx_format
自定义json格式日志
nginx的默认日志格式记录的内容相对单一,且默认的格式也不方便后期做日志统计分析,生产环境中通常将nginx日志格式为json格式,然后配合ELK做日志收集、统计和分析。
配置示例:
http {
    ...
    log_format json_log
        '{"@timestamp":"$time_iso8601",'
        '"clientip":"$remote_addr",'
        '"size":$body_bytes_sent,'
        '"responsetime":$request_time,'
        '"upstreamtime":"$upstream_response_time",'
        '"upstreamhost":"$upstream_addr",'
        '"http_host":"$host",'
        '"uri":"$uri",'
        '"xff":"$http_x_forwarded_for",'
        '"referer":"$http_referer",'
        '"tcp_xff":"$proxy_protocol_addr",'
        '"http_user_agent":"$http_user_agent",'
        '"status":"$status"}';
    access_log logs/access.log json_log;
    ...
}

##重启nginx,查看生成的日志格式
[root@centos7 nginx]# tail -1 logs/access.log
{"@timestamp":"2022-08-04T19:27:18+08:00","clientip":"127.0.0.1","size":6,"responsetime":0.000,"upstreamtime":"-","upstreamhost":"-","http_host":"localhost","uri":"/index.html","xff":"-","referer":"-","tcp_xff":"-","http_user_agent":"curl/7.29.0","status":"200"
Nginx 压缩功能
Nginx支持对指定类型的文件进行压缩然后再传输给客户端,而且压缩还可以设置压缩比例,压缩后的
文件大小将比源文件显著变小,这样有助于降低出口带宽的利用率,降低企业的IT支出,不过会占用相
应的CPU资源。
Nginx对文件的压缩功能是依赖于模块 ngx_http_gzip_module,默认是内置模块
官方文档:https:/nginx.org/en/docs/http/ngx_http_gzip_module.html
格式:
Syntax:	gzip on | off;
Default:
gzip off;
Context:	http, server, location, if in location
相关指令:
#启用或禁用gzip压缩,默认关闭
gzip on | off;

#压缩比由低到高从1到9,默认为1
gzip_comp_level level;

#禁用IE6 gzip功能
gzip_disable "MSIE [1-6]\.";

#gzip压缩的最小文件,小于设置值的文件将不会压缩
gzip_min_length 1k;

#启用压缩功能时,协议的最小版本,默认HTTP/1.1
gzip_http_version 1.0 | 1.1;

#指定Nginx服务需要向服务器申请的缓存空间的个数和大小,平台不同,默认:32 4k或者16 8k;
gzip_buffers number size;

#指明仅对哪些类型的资源执行压缩操作;默认为gzip_types text/html,不用显示指定,否则出错
gzip_types mime-type ...;

#如果启用压缩,是否在响应报文首部插入“Vary: Accept-Encoding”,一般建议打开
gzip_vary on | off;

#预压缩,即直接从磁盘找到对应文件的gz后缀的式的压缩文件返回给用户,无需消耗服务器CPU
#注意: 来自于ngx_http_gzip_static_module模块
gzip_static on | off;
示例:
##分别生成5Bytes 大小的index.html文件以及2k大小的2k.text
[root@centos7 ~]# echo test > /apps/nginx/html/pc/index.html
[root@centos7 ~]# dd if=/dev/zero of=/apps/nginx/html/pc/2k.text bs=2k count=1
1+0 records in
1+0 records out
2048 bytes (2.0 kB) copied, 0.000405459 s, 5.1 MB/s
[root@centos7 ~]# ll /apps/nginx/html/pc/2k.text -h
-rw-r--r-- 1 root root 2.0K Aug  4 20:01 /apps/nginx/html/pc/2k.text
[root@centos7 ~]# ll /apps/nginx/html/pc/index.html -h
-rw-r--r-- 1 nginx nginx 5 Aug  4 19:43 /apps/nginx/html/pc/index.html

#准备站点配置
[root@centos7 ~]# cat /apps/nginx/conf.d/pc.conf
server {
  listen 80 default_server;
  server_name pc.test.org;

  gzip on;
  gzip_comp_level 5;
  gzip_min_length 1k;   #小于1k的文件不压缩
  gzip_types text/plain application/javascript application/x-javascript text/css
  application/xml text/javascript application/x-httpd-php image/gif image/png;

  gzip_vary on;
  location / {
   	index index.html;
	default_type text/html;
	root html/pc;
   }
}

[root@centos7 ~]# nginx -s reload
[root@centos7 ~]# curl -I --compressed pc.test.org/index.html
HTTP/1.1 200 OK
Server: nginx/1.18.0
Date: Thu, 04 Aug 2022 12:02:22 GMT
Content-Type: text/html
Content-Length: 5        #index.html文件未压缩,仍是5Bytes
Last-Modified: Thu, 04 Aug 2022 11:43:47 GMT
Connection: keep-alive
Keep-Alive: timeout=60
ETag: "62ebb0f3-5"
Accept-Ranges: bytes

[root@centos7 ~]# curl -I --compressed pc.test.org/2k.txt
HTTP/1.1 404 Not Found
Server: nginx/1.18.0
Date: Thu, 04 Aug 2022 12:02:34 GMT
Content-Type: text/html
Content-Length: 153   #2k.txt被压缩为153Bytes
Connection: keep-alive
Keep-Alive: timeout=60
Nginx 配置https
https 相关参数
nginx 的https 功能基于模块ngx_http_ssl_module实现,作为nginx的核心功能,yum安装的nginx默认就是开启的,编译安装的nginx需要指定编译参数–with-http_ssl_module开启。
官方文档:https:/nginx.org/en/docs/http/ngx_http_ssl_module.html
相关指令:
#为指定的虚拟主机配置是否启用ssl功能,此功能在1.15.0废弃,使用listen [ssl]替代
ssl on | off;
listen 443 ssl;

#指向包含当前虚拟主机和CA的两个证书信息的文件,一般是crt文件
ssl_certificate /path/to/file;

#当前虚拟主机使用的私钥文件,一般是key文件
ssl_certificate_key /path/to/file;

#支持ssl协议版本,早期为ssl现在是TLS,默认为后三个


#配置ssl缓存
ssl_session_cache off | none | [builtin[:size]] [shared:name:size];
   	off: #关闭缓存
 	none:  #通知客户端支持ssl session cache,但实际不支持
 	builtin[:size]:#使用OpenSSL内建缓存,为每worker进程私有
 	[shared:name:size]:#在各worker之间使用一个共享的缓存,需要定义一个缓存名称和缓存空间大小,一兆可以存储4000个会话信息,多个虚拟主机可以使用相同的缓存名称

#客户端连接可以复用ssl session cache中缓存的有效时长,默认5m
ssl_session_timeout time;
自签名证书
生成自签名证书
##进入nginx安装目录,新建存放证书的目录
[root@centos7 ~]# cd /apps/nginx/
[root@centos7 nginx]# mkdir certs
[root@centos7 nginx]# cd certs/

##生成自签名CA证书ca.crt和私钥ca.key
[root@centos7 certs]# openssl req -newkey rsa:4096 -nodes -sha256 -keyout ca.key -x509 -days 3650 -out ca.crt
Generating a 4096 bit RSA private key
...........................................................................................++
................................................................................................................................................................................++
writing new private key to 'ca.key'
-----
You are about to be asked to enter information that will be incorporated
into your certificate request.
What you are about to enter is what is called a Distinguished Name or a DN.
There are quite a few fields but you can leave some blank
For some fields there will be a default value,
If you enter '.', the field will be left blank.
-----
Country Name (2 letter code) [XX]:cn
State or Province Name (full name) []:sichuan
Locality Name (eg, city) [Default City]:chengdu
Organization Name (eg, company) [Default Company Ltd]:nginx
Organizational Unit Name (eg, section) []:nginx.com
Common Name (eg, your name or your server's hostname) []:www.nginx.com
Email Address []:22@qq.com
[root@centos7 certs]# ls
ca.crt  ca.key

##生成网站私钥www.nginx.com.key和证书请求www.nginx.com.csr
[root@centos7 certs]# openssl req -newkey rsa:4096 -nodes -sha256 -keyout www.nginx.com.key -out www.nginx.com.csr
Generating a 4096 bit RSA private key
.......++
...................................................................................++
writing new private key to 'www.nginx.com.key'
-----
You are about to be asked to enter information that will be incorporated
into your certificate request.
What you are about to enter is what is called a Distinguished Name or a DN.
There are quite a few fields but you can leave some blank
For some fields there will be a default value,
If you enter '.', the field will be left blank.
-----
Country Name (2 letter code) [XX]:cn       #国家
State or Province Name (full name) []:sichuan #省份
Locality Name (eg, city) [Default City]:chengdu #城市
Organization Name (eg, company) [Default Company Ltd]:nginx #公司
Organizational Unit Name (eg, section) []:nginx.com #部门
Common Name (eg, your name or your server's hostname) []:www.nginx.com #通用名
Email Address []:511670559@qq.com  #邮箱

Please enter the following 'extra' attributes
to be sent with your certificate request
A challenge password []:
An optional company name []:
[root@centos7 certs]# ls www*
www.nginx.com.csr  www.nginx.com.key  www.nginx.crt

##使用ca签发网站的证书www.nginx.crt
[root@centos7 certs]# openssl x509 -req -days 3650 -in www.nginx.com.csr -CA ca.crt -CAkey ca.key -CAcreateserial -out www.nginx.com.crt
Signature ok
subject=/C=cn/ST=sichuan/L=chengdu/O=nginx/OU=nginx.com/CN=www.nginx.com/emailAddress=511670559@qq.com
Getting CA Private Key
[root@centos7 certs]# ls
ca.crt  ca.key  ca.srl  www.nginx.com.crt  www.nginx.com.csr  www.nginx.com.key

##查看证书内容
[root@centos7 certs]# openssl x509 -in www.nginx.com.crt -noout -text
Certificate:
    Data:
        Version: 1 (0x0)
        Serial Number:
            f5:49:30:f5:10:2f:4b:ea
    Signature Algorithm: sha256WithRSAEncryption
        Issuer: C=cn, ST=sichuan, L=chengdu, O=nginx, OU=nginx.com, CN=www.nginx.com/emailAddress=22@qq.com
        Validity
            Not Before: Aug  4 14:48:57 2022 GMT
            Not After : Aug  1 14:48:57 2032 GMT
        Subject: C=cn, ST=sichuan, L=chengdu, O=nginx, OU=nginx.com, CN=www.nginx.com/emailAddress=511670559@qq.com
        Subject Public Key Info:
            Public Key Algorithm: rsaEncryption
                Public-Key: (4096 bit)
...

## 将ca证书和网站证书输出到一个文件(注意前后次序)
[root@centos7 certs]# cat www.nginx.com.crt ca.crt > www.nginx.com.pem
https 配置
##准备站点配置文件
[root@centos7 certs]# cat /apps/nginx/conf.d/pc.conf
server {
  listen 80;
  listen 443 ssl;
  server_name pc.test.org;

  location / {
   	index index.html;
	default_type text/html;
	root html/pc;
   }
  ssl_certificate /apps/nginx/certs/www.nginx.com.pem;
  ssl_certificate_key /apps/nginx/certs/www.nginx.com.key;
  ssl_session_cache shared:sslcache:20m;
}

##重启nginx
[root@centos7 certs]# nginx -t
nginx: the configuration file /apps/nginx/conf/nginx.conf syntax is ok
nginx: configuration file /apps/nginx/conf/nginx.conf test is successful
[root@centos7 certs]# nginx -s reload
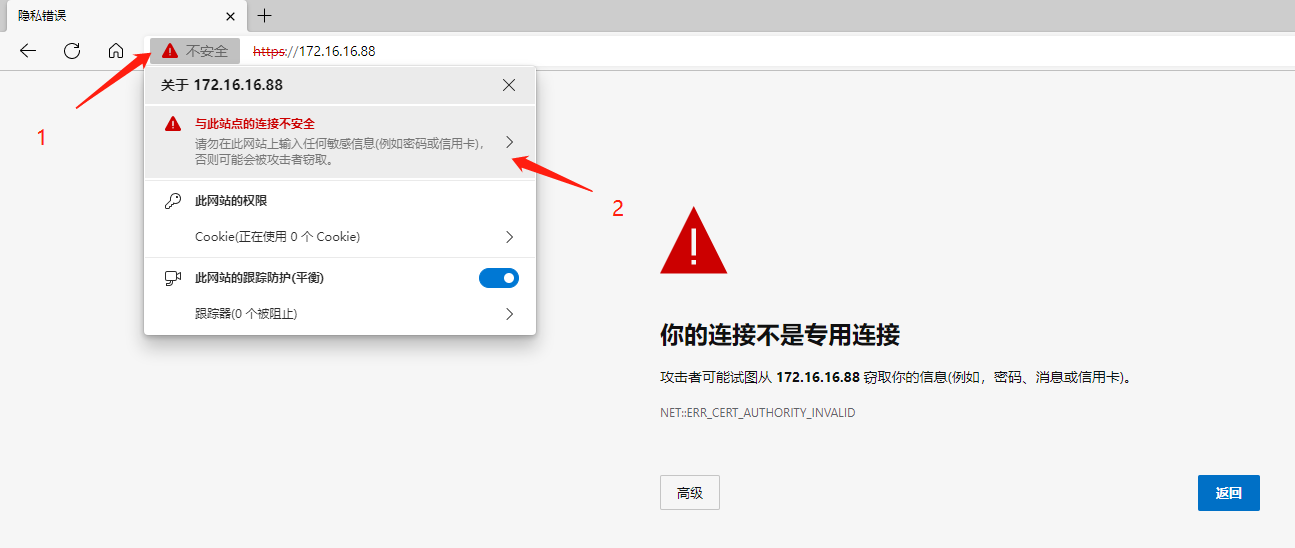
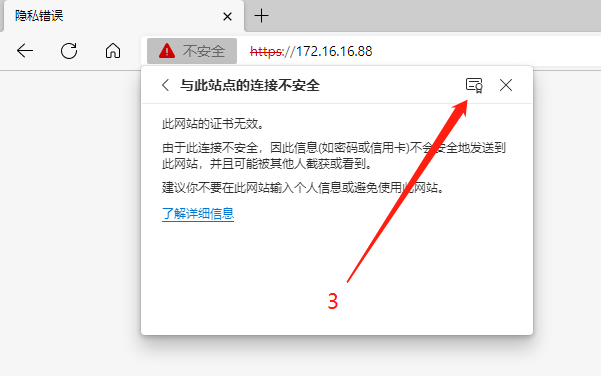
浏览器访问测试,由于是自签名证书,浏览器并不信任

实现多域名 https
Nginx 支持基于单个IP实现多域名的功能,并且还支持单IP多域名的基础之上实现HTTPS,其实是基于Nginx的 SNI(Server Name Indication)功能实现,SNI是为了解决一个Nginx服务器内使用一个IP绑定多个域名和证书的功能。其实现流程是客户端在连接到服务器建立SSL链接之前先发送要访问站点的域名(Hostname),这样服务器再根据这个域名返回给客户端一个合适的证书。
简单来说,SNI实现了为多个虚拟主机配置各自的https认证功能,配置方式和上一节内容类似,这里不做演示。
查看nginx支持SNI功能:
[root@centos7 nginx]# nginx -V
nginx version: nginx/1.18.0
built by gcc 4.8.5 20150623 (Red Hat 4.8.5-44) (GCC)
built with OpenSSL 1.0.2k-fips  26 Jan 2017
TLS SNI support enabled  		#支持SNI功能
configure arguments: --prefix=/apps/nginx --user=nginx --group=nginx --with-http_ssl_module --with-http_v2_module --with-http_realip_module --with-http_stub_status_module --with-http_gzip_static_module --with-pcre --with-stream --with-stream_ssl_module --with-stream_realip_module --add-module=/usr/local/src/echo-nginx-module
实现 HSTS
官方文档:https:/www.nginx.com/blog/http-strict-transport-security-hsts-and-nginx/
未配置http跳转的情况时:
实例:
# 站点配置
[root@centos7 conf.d]# cat pc.conf
server {
listen 80;
listen 443 ssl;
ssl_certificate /apps/nginx/certs/www.nginx.com.pem;
ssl_certificate_key /apps/nginx/certs/www.nginx.com.key;
ssl_session_cache shared:sslcache:20m;
ssl_session_timeout 10m;
server_name pc.test.org;
location / {
index index.html;
default_type text/html;
root html/;
}
}
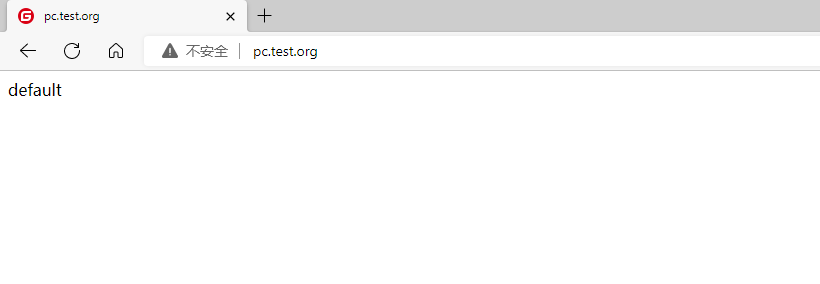
#http访问成功
[root@centos7 conf.d]# curl www.test.org
default
#https请求报错
[root@centos7 conf.d]# curl www.test.org:443
<html>
<head><title>400 The plain HTTP request was sent to HTTPS port</title></head>
<body>
<center><h1>400 Bad Request</h1></center>
<center>The plain HTTP request was sent to HTTPS port</center>
<hr><center>nginx/1.18.0</center>
</body>
</html>
配置rewrite实现http跳转https后:
范例:
##站点配置
[root@centos7 conf.d]# cat pc.conf
server {
  listen 80;
  listen 443 ssl;
  ssl_certificate /apps/nginx/certs/www.nginx.com.pem;
  ssl_certificate_key /apps/nginx/certs/www.nginx.com.key;
  ssl_session_cache shared:sslcache:20m;
  ssl_session_timeout 10m;
  server_name pc.test.org;
  add_header Strict-Transport-Security "max-age=31536000; includeSubDomains"
always; #开启客户端缓存功能,当发起http请求时优先访问缓存,直接进行本地http跳转
  location / {
   	index index.html;
	default_type text/html;
	root html/;

	    #配置http跳转https
        if ( $scheme = http ) {
            rewrite ^/(.*)$ https:/www.test.org/$1 redirect;
        }

   }
}

#发起http请求,返回响应码为302
[root@centos7 conf.d]# curl pc.test.org
<html>
<head><title>302 Found</title></head>
<body>
<center><h1>302 Found</h1></center>
<hr><center>nginx/1.18.0</center>
</body>
</html>

[root@centos7 conf.d]# curl pc.test.org -L  #跟踪302重定向后又报证书校验错误
curl: (60) Peer's certificate issuer has been marked as not trusted by the user.
More details here: http:/curl.haxx.se/docs/sslcerts.html

curl performs SSL certificate verification by default, using a "bundle"
 of Certificate Authority (CA) public keys (CA certs). If the default
 bundle file isn't adequate, you can specify an alternate file
 using the --cacert option.
If this HTTPS server uses a certificate signed by a CA represented in
 the bundle, the certificate verification probably failed due to a
 problem with the certificate (it might be expired, or the name might
 not match the domain name in the URL).
If you'd like to turn off curl's verification of the certificate, use
 the -k (or --insecure) option.

# 发起http请求,自动跳转https成功
[root@centos7 conf.d]# curl pc.test.org -kL  #跟随重定向并忽略证书安全性检查,请求成功
default
关于 favicon.io
favicon.ico 文件是网站标签页的小图标,当客户端使用浏览器问页面时,浏览器会自己主动发起请求获取页面的favicon.ico文件,但是当浏览器请求的favicon.ico文件不存在时,服务器会记录404日志,而且浏览器也会显示404报错
图标位置:

报错如下:
[root@centos7 nginx]# tail -1 logs/error.log  # 日志中的报错
2022/08/05 17:47:54 [error] 2604#0: *200 open() "/apps/nginx/html/favicon.ico" failed (2: No such file or directory), client: 172.16.16.1, server: pc.test.org, request: "GET /favicon.ico HTTP/1.1", host: "pc.test.org", referrer: "http:/pc.test.org/"

[root@centos7 nginx]# ls /apps/nginx/html/favicon.ico # 文件确实不存在
ls: cannot access /apps/nginx/html/favicon.ico: No such file or directory
解决方案:
#将自己的图标命令为favicon.ico放置于指定目录下
[root@centos7 html]# wget https:/gitee.com/favicon.ico -P  /apps/nginx/html/
[root@centos7 html]# ll /apps/nginx/html/favicon.ico
-rw-r--r-- 1 root root 41566 Jun 10 11:59 /apps/nginx/html/favicon.ico
访问测试(浏览器按快捷键 CTRL+F5 强制刷新)
OpenSSL版本升级
OpenSSL程序库当前广泛用于实现互联网的传输层安全(TLS)协议。心脏出血(Heartbleed),也简
称为心血漏洞,是一个出现在加密程序库OpenSSL的安全漏洞,此漏洞于2012年被引入了软件中,
2014年4月首次向公众披露。只要使用的是存在缺陷的OpenSSL实例,无论是服务器还是客户端,都可
能因此而受到攻击。此问题的原因是在实现TLS的心跳扩展时没有对输入进行适当验证(缺少边界检
查),因此漏洞的名称来源于“心跳”(heartbeat)。该程序错误属于缓冲区过读,即可以读取的数据比应该允许读取的还多。
范例:升级OpenSSL解决安全漏洞
[root@centos7 ~]# nginx -V
nginx version: nginx/1.18.0
built by gcc 4.8.5 20150623 (Red Hat 4.8.5-44) (GCC)
built with OpenSSL 1.0.2k-fips  26 Jan 2017  #当前OpenSSL版本
TLS SNI support enabled
configure arguments: --prefix=/apps/nginx --user=nginx --group=nginx --with-http_ssl_module --with-http_v2_module --with-http_realip_module --with-http_stub_status_module --with-http_gzip_static_module --with-pcre --with-stream --with-stream_ssl_module --with-stream_realip_module --add-module=/usr/local/src/echo-nginx-module

##下载较新版本OpenSSL源码包
[root@centos7 ~]# cd /usr/local/src/
[root@centos7 src]# wget https:/www.openssl.org/source/openssl-1.1.1h.tar.gz --no-check-certificate
[root@centos7 src]# tar xf openssl-1.1.1h.tar.gz

##编译安装OpenSSL
[root@centos7 src]# cd /usr/local/src/nginx-1.18.0/
[root@centos7 nginx-1.18.0]# ./configure --prefix=/apps/nginx --user=nginx --group=nginx --with-http_ssl_module --with-http_v2_module --with-http_realip_module --with-http_stub_status_module --with-http_gzip_static_module --with-pcre --with-stream --with-stream_ssl_module --with-stream_realip_module --add-module=/usr/local/src/echo-nginx-module  --with-openssl=/usr/local/src/openssl-1.1.1h  #注意OpenSSL路径要添加正确
[root@centos7 nginx-1.18.0]# make && make install

#语法检查通过
[root@centos7 nginx-1.18.0]# nginx -t
nginx: the configuration file /apps/nginx/conf/nginx.conf syntax is ok
nginx: configuration file /apps/nginx/conf/nginx.conf test is successful

[root@centos7 nginx-1.18.0]# nginx -V
nginx version: nginx/1.18.0
built by gcc 4.8.5 20150623 (Red Hat 4.8.5-44) (GCC)
built with OpenSSL 1.1.1h  22 Sep 2020  #版本升级成功
TLS SNI support enabled
configure arguments: --prefix=/apps/nginx --user=nginx --group=nginx --with-http_ssl_module --with-http_v2_module --with-http_realip_module --with-http_stub_status_module --with-http_gzip_static_module --with-pcre --with-stream --with-stream_ssl_module --with-stream_realip_module --add-module=/usr/local/src/echo-nginx-module --with-openssl=/usr/local/src/openssl-1.1.1h